Docker如何構建ELKDocker集群日志收集系統
這篇文章主要介紹了Docker如何構建ELK Docker集群日志收集系統的相關知識,內容詳細易懂,操作簡單快捷,具有一定借鑒價值,相信大家閱讀完這篇Docker如何構建ELK Docker集群日志收集系統文章都會有所收獲,下面我們一起來看看吧。
成都創新互聯,為您提供重慶網站建設公司、成都網站制作、網站營銷推廣、網站開發設計,對服務食品包裝袋等多個行業擁有豐富的網站建設及推廣經驗。成都創新互聯網站建設公司成立于2013年,提供專業網站制作報價服務,我們深知市場的競爭激烈,認真對待每位客戶,為客戶提供賞心悅目的作品。 與客戶共同發展進步,是我們永遠的責任!
elk簡介
elk由elasticsearch、logstash和kiabana三個開源工具組成
elasticsearch是個開源分布式搜索引擎,它的特點有:分布式,零配置,自動發現,索引自動分片,索引副本機制,restful風格接口,多數據源,自動搜索負載等。
logstash是一個完全開源的工具,他可以對你的日志進行收集、過濾,并將其存儲供以后使用
kibana 也是一個開源和免費的工具,它kibana可以為 logstash 和 elasticsearch 提供的日志分析友好的 web 界面,可以幫助您匯總、分析和搜索重要數據日志。
使用docker搭建elk平臺
首先我們編輯一下 logstash的配置文件 logstash.conf
input {
  udp {
  port => 5000
  type => json
 }
}
filter {
  json {
   source => "message"
  }
}
output {
  elasticsearch {
       hosts => "elasticsearch:9200" #將logstash的輸出到 elasticsearch 這里改成你們自己的host
  }
}
然后我們還需要需要一下kibana 的啟動方式
編寫啟動腳本 等待elasticserach 運行成功后啟動
#!/usr/bin/env bash

# wait for the elasticsearch container to be ready before starting kibana.
echo "stalling for elasticsearch"
while true; do
  nc -q 1 elasticsearch 9200 2>/dev/null && break
done

echo "starting kibana"
exec kibana
修改dockerfile 生成自定義的kibana鏡像
from kibana:latest

run apt-get update && apt-get install -y netcat

copy entrypoint.sh /tmp/entrypoint.sh
run chmod +x /tmp/entrypoint.sh

run kibana plugin --install elastic/sense

cmd ["/tmp/entrypoint.sh"]
同時也可以修改一下kibana 的配置文件 選擇需要的插件
# kibana is served by a back end server. this controls which port to use.
port: 5601

# the host to bind the server to.
host: "0.0.0.0"

# the elasticsearch instance to use for all your queries.
elasticsearch_url: "http://elasticsearch:9200"

# preserve_elasticsearch_host true will send the hostname specified in `elasticsearch`. if you set it to false,
# then the host you use to connect to *this* kibana instance will be sent.
elasticsearch_preserve_host: true

# kibana uses an index in elasticsearch to store saved searches, visualizations
# and dashboards. it will create a new index if it doesn't already exist.
kibana_index: ".kibana"

# if your elasticsearch is protected with basic auth, this is the user credentials
# used by the kibana server to perform maintence on the kibana_index at statup. your kibana
# users will still need to authenticate with elasticsearch (which is proxied thorugh
# the kibana server)
# kibana_elasticsearch_username: user
# kibana_elasticsearch_password: pass

# if your elasticsearch requires client certificate and key
# kibana_elasticsearch_client_crt: /path/to/your/client.crt
# kibana_elasticsearch_client_key: /path/to/your/client.key

# if you need to provide a ca certificate for your elasticsarech instance, put
# the path of the pem file here.
# ca: /path/to/your/ca.pem

# the default application to load.
default_app_id: "discover"

# time in milliseconds to wait for elasticsearch to respond to pings, defaults to
# request_timeout setting
# ping_timeout: 1500

# time in milliseconds to wait for responses from the back end or elasticsearch.
# this must be > 0
request_timeout: 300000

# time in milliseconds for elasticsearch to wait for responses from shards.
# set to 0 to disable.
shard_timeout: 0

# time in milliseconds to wait for elasticsearch at kibana startup before retrying
# startup_timeout: 5000

# set to false to have a complete disregard for the validity of the ssl
# certificate.
verify_ssl: true

# ssl for outgoing requests from the kibana server (pem formatted)
# ssl_key_file: /path/to/your/server.key
# ssl_cert_file: /path/to/your/server.crt

# set the path to where you would like the process id file to be created.
# pid_file: /var/run/kibana.pid

# if you would like to send the log output to a file you can set the path below.
# this will also turn off the stdout log output.
log_file: ./kibana.log
# plugins that are included in the build, and no longer found in the plugins/ folder
bundled_plugin_ids:
 - plugins/dashboard/index
 - plugins/discover/index
 - plugins/doc/index
 - plugins/kibana/index
 - plugins/markdown_vis/index
 - plugins/metric_vis/index
 - plugins/settings/index
 - plugins/table_vis/index
 - plugins/vis_types/index
 - plugins/visualize/index
好了下面我們編寫一下 docker-compose.yml 方便構建
端口之類的可以根據自己的需求修改 配置文件的路徑根據你的目錄修改一下 整體系統配置要求較高 請選擇配置好點的機器
elasticsearch:
 image: elasticsearch:latest
 command: elasticsearch -des.network.host=0.0.0.0
 ports:
  - "9200:9200"
  - "9300:9300"
logstash:
 image: logstash:latest
 command: logstash -f /etc/logstash/conf.d/logstash.conf
 volumes:
  - ./logstash/config:/etc/logstash/conf.d
 ports:
  - "5001:5000/udp"
 links:
  - elasticsearch
kibana:
 build: kibana/
 volumes:
  - ./kibana/config/:/opt/kibana/config/
 ports:
  - "5601:5601"
 links:
  - elasticsearch
#好了命令 就可以直接啟動elk了
docker-compose up -d
訪問之前的設置的kibanna的5601端口就可以看到是否啟動成功了
使用logspout收集docker日志
下一步我們要使用logspout對docker日志進行收集 我們根據我們的需求修改一下logspout鏡像
編寫配置文件 modules.go
package main

import (
  _ "github.com/looplab/logspout-logstash"
  _ "github.com/gliderlabs/logspout/transports/udp"

)
編寫dockerfile
from gliderlabs/logspout:latest
copy ./modules.go /src/modules.go
重新構建鏡像后 在各個節點運行即可
 docker run -d --name="logspout" --volume=/var/run/docker.sock:/var/run/docker.sock \
         jayqqaa12/logspout logstash://你的logstash地址
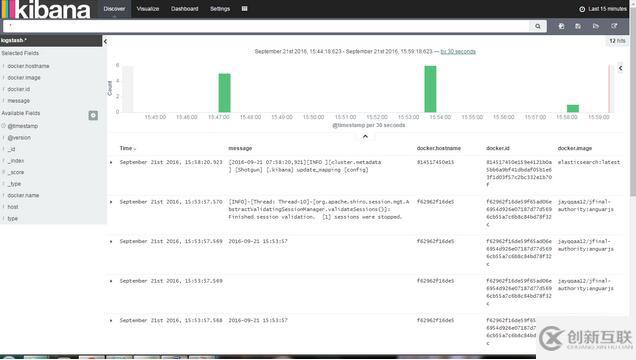
現在打開kibana 就可以看到收集到的 docker日志了
注意docker容器應該選擇以console輸出 這樣才能采集到
關于“Docker如何構建ELK Docker集群日志收集系統”這篇文章的內容就介紹到這里,感謝各位的閱讀!相信大家對“Docker如何構建ELK Docker集群日志收集系統”知識都有一定的了解,大家如果還想學習更多知識,歡迎關注創新互聯行業資訊頻道。
名稱欄目:Docker如何構建ELKDocker集群日志收集系統
轉載注明:http://m.2m8n56k.cn/article26/jdscjg.html
成都網站建設公司_創新互聯,為您提供面包屑導航、網站設計、企業建站、關鍵詞優化、網站維護、網站收錄
聲明:本網站發布的內容(圖片、視頻和文字)以用戶投稿、用戶轉載內容為主,如果涉及侵權請盡快告知,我們將會在第一時間刪除。文章觀點不代表本網站立場,如需處理請聯系客服。電話:028-86922220;郵箱:631063699@qq.com。內容未經允許不得轉載,或轉載時需注明來源: 創新互聯

- 品牌網站設計制作-是企業對外的名片和形象 2020-11-28
- 品牌網站設計都需要一個“新聞工具包” 2023-03-02
- 好的品牌網站設計兩大要點必知 2022-06-10
- 想要做好品牌網站設計的4個要點 2022-01-09
- 北京網站建設公司對于品牌網站設計的理念 2022-05-02
- 企業品牌網站設計思路介紹 2023-01-29
- 品牌網站設計開發要點 2016-11-09
- 品牌網站設計如何做好用戶體驗 2021-10-03
- 品牌網站設計的四大原則 2013-09-05
- 品牌網站設計有哪些問題要注意? 2020-12-26
- 品牌網站設計優越性提升企業建站水平 2021-04-18
- 品牌網站設計制作過程中要注意哪些問題? 2020-12-03